
----
July 2013
Nick
Gravagne
Class
– One-Day Piano Prep
Customer Communication
·
Avoid slick sales manship. Consumers today, especially the savvy
ones, can spot a sales pitch from a mile away. You may win a few,
but you will lose most.
·
Be a Solution Based company.
This
means don't recommend or sell you anything your customers
don’t need. Listen to your customers to find out exactly
what problems they have and what they need. Together, find and
agree upon a solution before the work is started. Specialize and
generalize by offering full line diagnostics, parts and repair.
Make recommendations on upgrades to make your customer’s
piano perform better.
In
other words, Solve their problems within their budget. If this
can’t be done you will have to decline any work.
·
Remember “You’re The Pro – You should Know!”
·
Do Not Denigrate Their Piano. It may mean a lot to them
regardless of its condition.
·
Practice being neutral. Be StarTrek’s Mr. Spock.
·
Learn to preface your comments on the piano’s condition with
the phrase:
“When Your Piano Was New …”
o
Example: Avoid saying, “These hammers are in terrible shape
and seriously need reshaping…”
o
Rather say: “When your piano was new your hammers were round
on top and not flat and grooved like they are now.”
o
Guide your customer in discovering the piano’s ills and
possible treatments.
·
Use the Checklist to qualify the piano as a One-Day candidate for
upgrade.
Pricing
– typically based on what you would otherwise earn if you
were tuning pianos all day (say four tunings at your standard
retail rate). That said; I subtract out the cost of expensive gas
and wear and tear on the vehicle. Use either actual costs or
depreciation pro-rata miles you would have otherwise traveled
that you do not have to travel as you are spending the entire day
in one location.
On-Going
Service – the one-day prep idea is ideally supported by the
Full-Service arrangement. Explain to the customer that although
you can affect a noticeable improvement to touch and tone in one
day that many items will need future tweaking and readjustment.
The
Full-Service Concept can be as flexible as you and your customer
desire, and the frequency can be often as every tuning or twice
per year or even once per year.
Customer
Expectations
·
TONE mostly?
o
“It’s too bright, too dull and uneven. I can’t
seem to make nice music like I used to.”
o
Then concentrate on this, while at the regulation steps work
primarily with setting blow, letoff – drop, rep springs and
hammer line for AfterTouch.
·
TOUCH mostly?
o
“I can’t play softly, notes won’t repeat.
I’m thinking of selling the piano!”
o
Then concentrate on this, taking regulations to a finer degree.
As to tone; tune, file hammers for shape and squareness, and fit
hammers to strings.
On an aging
piano, but reasonably decent, what is the usual issue with the
regulation?
·
AfterTouch is missing or else compromised, and rep springs are
weak.
·
Three action compaction points responsible for loss of AfterTouch
o
Balance rail punching compaction
o
Whip heel compaction
o
Knuckle compaction
o
QUCIK REMEDY: raise the capstan screw to reestablish blow. This
alone cures a multitude of problems.
On an aging
piano, but reasonably decent, what is the usual issue with the
tone?
·
Harsh tone, uneven (maybe too dull). Dynamic range compromised.
·
Three considerations here:
o
Flat hammers (but not worn out)
o
Tight and inflexible hammer shoulders
o
Hammers not mated to strings
o
REMEDIES: shape hammers, needle shoulders (or otherwise open up
with liquids), mate hammers to strings.
TOOLS
– TIPS – GADGETS TO MAKE THE JOB EASIER AND MORE
EFFICIENT
·
The Laroy Edwards cart (or something like it) is a must
ACTION ON
EDWARDS CART
·
Sand paper strips of various grits (with tape backing)
·
Long straightedge for keys and eyeballing hammer line
o
Recommend WNG, see at http://www.wessellnickelandgross.com
o
due to its I-Beam construction this item is true and doesn’t
easily fall over
·
Hammer softener from Pianotek
·
Hammer hardener from Pianotek
·
Magnetic strips for letoff from Pianotek
·
Hammer tail support rail
·
Good lighting and flashlights
·
Extension cords or reel
·
Mini vacuum cleaner / blower
·
Pad and pencil for notes
·
Dust masks
·
Small fan if working in heat
·
Small heater if working in cold
·
Water bottles and personal items
·
Moving blanket for lid of grand piano
·
Perhaps a small fold up card table for convenience
MAKE IT A
JIG-LESS GIG
·
SANS – Action regulating racks!
·
Set letoff in the piano via magnetic strips
·
Set drop by eye, relative to letoff
·
Set Backchecking to samples and test in the piano
o
Set remaining backchecks by eye and then check
PUTTING THE
KIBOSH ON THE DEAL!
Look to
disqualify the piano as a one-day prep candidate
KIBOSH
ITEMS (disqualify the piano for a One-Day prep)
·
Very worn key bushings, hammers, action parts
·
Worn out balance holes, keys chucking badly
·
Wholesale misalignment of parts
·
Too much hammer burn-in required
·
Loose tuning pins, rust, etc.
·
Dampers way off for timing, etc.
·
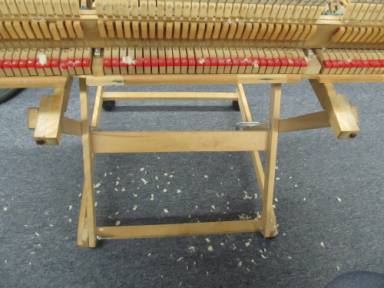
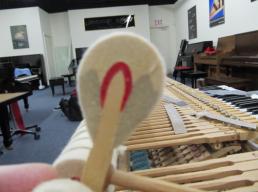
Major key knocking of front rail
o
Photo of key striker
·
Key level way off, or entire key level too low (or high)
o
Requires major punching work
·
Dip way off (though not necessarily a Kibosh item – Depends)
·
Pedals and Lyre way out, requiring more than simple adjustments.
Pedals loose, noisy, wobbles, etc.
·
Sostenuto system way out of adjustment
·
Majority of hammers will not check (even with AfterTouch present)
·
Targeted customer complaints requiring hyper-focused repair
effort
·
In fact, anything that does not fit into the work procedure
outlined below
·
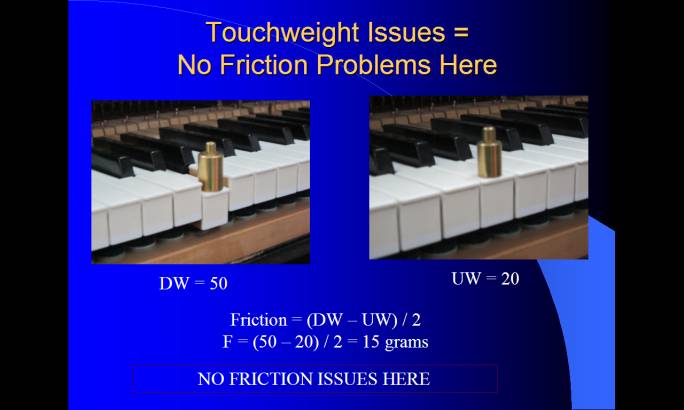
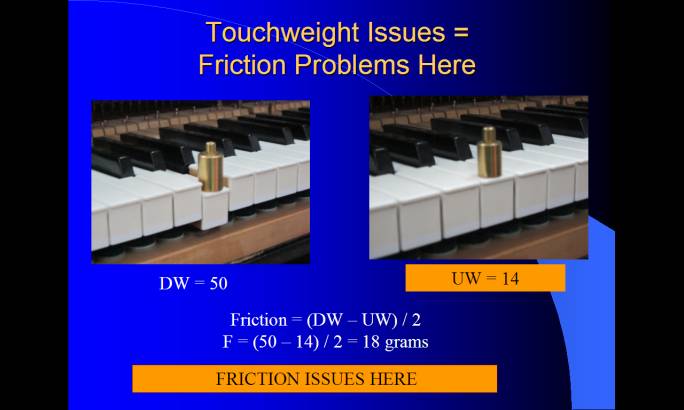
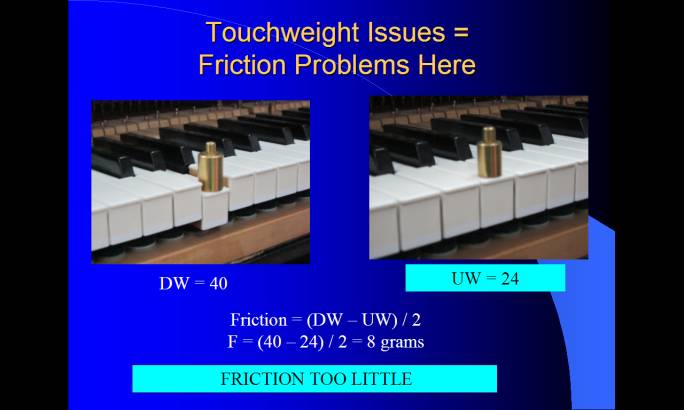
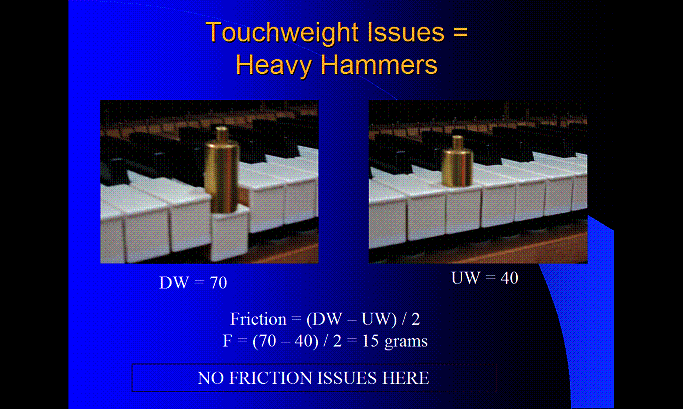
Touchweight issues – hard to play or flyaway, high inertia,
friction issues
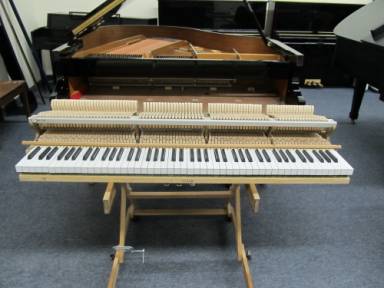
The Work
Begins! It is now 8AM
PRELIMS TO AFTERTOUCH REGULATION
(4
hours max with a 15 minute break somewhere)
Do
the following before you remove the action
·
String work:
o
Lightly tap strings to bridges (don’t overdo!)
o
Level strings at strike points to bubble gage
o
Option here: forgo the bubble and block hammers to strings
later on in this project list
·
Tune / pitch raise piano
·
Check action shift and correct now or make note
·
Remove fallboard and cheekblocks
·
Check for hammer alignment to strings
Felt raises hammers --- easier to block to strings for both
spacing and voicing
CHECK FOR HAMMER ALIGNMENT (SPACING) TO STRINGS
o
Expect a few corrections and adjust these now. OK.
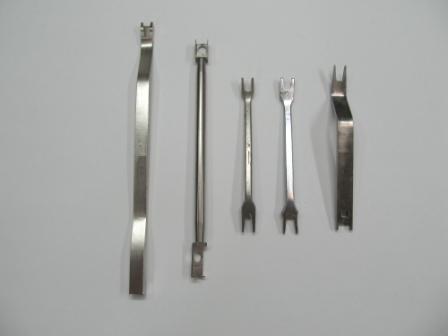
FLANGE SPACING TOOLS
o
But if wholesale alignment required then this may be a KIBOSH
item
o
Or, the left keyframe block needs shimmed a bit to the right
·
Check glide bolts for positive contact, or are they knocking?
o
Correct now
·
Adjust sustain pedal for “throw”
o
First reduce lost motion; adjust rod to where the damper lift
tray sits about 3 to 4 mm below the damper levers
o
Next, press sustain pedal in order to determine if:
o
It lifts dampers higher than depressed keys lift them
§
TEST: Play a chord with both hands and hold down keys.
Activate sustain pedal. If damper heads rise higher than the keys
raise them, the pedal sustain throw needs to be limited with
either a felt spacer (Steinway) or capstan adjustment type screw
found on many Asian pianos
§
Means sustain pedal throw needs to be limited as it is raising
all dampers beyond where the key ends lift them
o
Do depressed keys hold damper heads higher than sustain pedal
(play and hold down a chord)?
§
Means sustain pedal throw needs to be increased
Ideally,
damper heads should rise to same height whether lifted by key
ends or sustain pedal.
·
Check damper upstop rail (after sustain pedal throw has been
set!)
o
Play a sharp key and hold down, now lift damper head. If it lifts
a good bit higher, the upstop rail is
too high. Should have a mm or 2 of play.
o
Use the clothespins trick to hold several dampers above their
neighbors
o
Or use “floating”
upstop rail trick (See later on in project list)
o
Upstop
rail is too low if dampers show no free play, or worse, if
damper levers are bumping hard into the upstop rail felt
·
Set Glides (if knocking) and / or to raise key level a tad
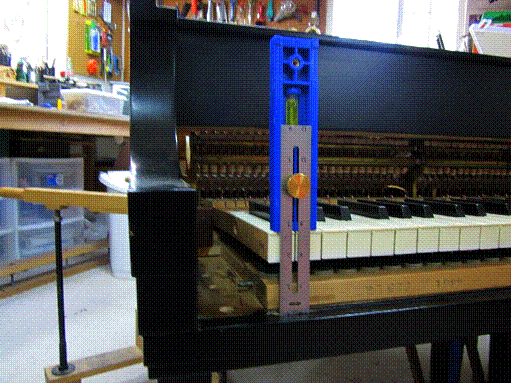
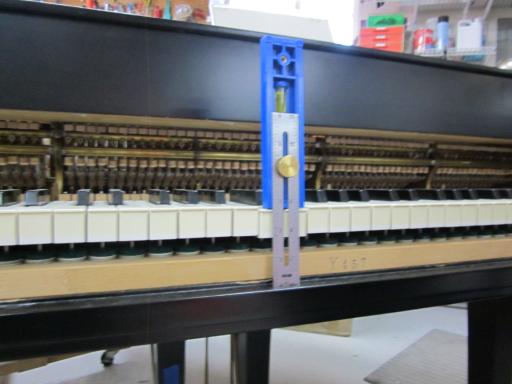
Keys low in center (exaggerated gap
showing). Imagine smaller gap: it is usually possible to lower
glides (raising balance rail) to raise all keys, but without
lifting the front rail off the keybed.
·
Spot level keys. Use short straightedge. Use the “cut
punching” and offset alligator tweezers trick. Place cut
punchings under felt balance punchings. Don’t get too fussy!
If close, leave alone. Remember your priorities and your
customer’s expectations.
·
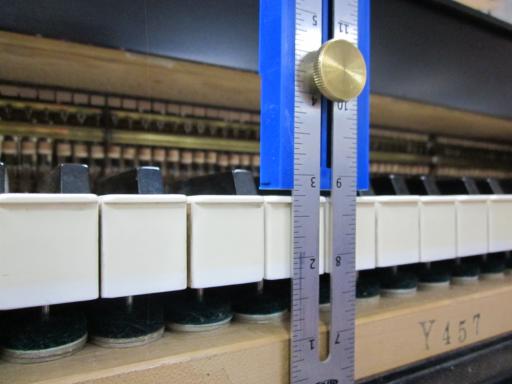
Quickly set samples for AfterTouch
o
Hammer blow distance per blow gage on a couple of notes per
section (this will likely change a bit so just get close for now)
§
For convenience choose the same notes such as A and E in each
section
o
Set sample letoff per gage (2mm a good all around spec)
o
Drop will probably be too “long” now. OK
NOTE:
positive drop (usually a bit excessive) is usually apparent in an
aging action that has not been tampered with. If positive drop is
not apparent, then turn all drop screws down a bit to make
it so. Failure to work with positive drop, even if too much at
this stage, will frustrate all further regulations!
o
Check and / or set dip samples to 10mm (+ or –) with
punchings
o
Check for AfterTouch, i.e., complete follow through of the
key-action train of events. (See AfterTouch in a
Nutshell below)
o
If AfterTouch is good, then proceed. If not (too little),
then decide how to make it happen. The usual fix is to fudge the
dip a bit deeper (dip range 0.375” or 9.5mm to 0.420”
or 10.7mm) and / or fudge the blow by making it shorter. Better
to do a bit of both. Whatever; do what is necessary to get good
follow through.
Note that
if the entire keyset is too low AfterTouch will suffer even if
other specs are correct. A too-low keyset is a KIBOSH item as it
involves wholesale raising of all keys at the balance pins.
Now,
carefully remove action for the first time
·
Clean soundboard and strings, action cavity ---- vacuum and / or
blow out
o
Optional: if not too bad, save to very end to
save time for more important tasks
·
Adjust damper upstop rail per the clothespin trick or “floating”
upstop rail method
·
Remove action stack and keys, remove and set keys on card table
or on blanket on top of piano lid
·
Vacuum action frame, action cavity and stack
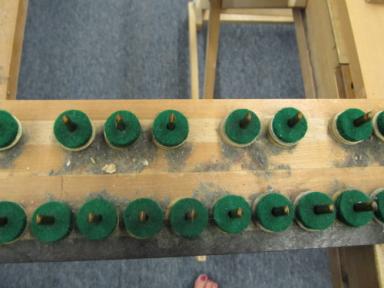
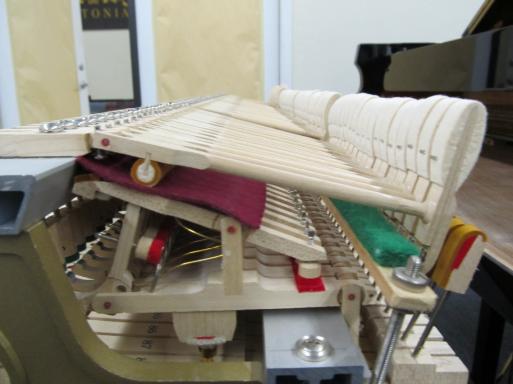
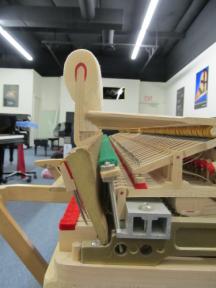
TYPICAL DIRTY ACTION FOR THIS AGE PIANO
·
Tighten action screws
·
McLube keypins, keybed, glides, shift spring, treble action frame
side (makes contact with shift spring)
·
Ease keys and replace on keypins
·
Lube knuckles with Teflon powder and brush and McLube rep tops

BRUSH ON THE TEFLON POWDER
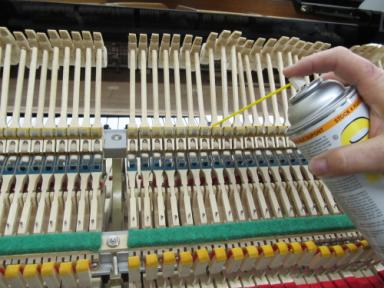
McLUBE
REP TOPS (NOT FOR KAWAI BLACK PARTS OR WNG COMPOSITES)
·
Reshape
the hammers, removing as little felt as possible from very
tops of hammers. Make sure that hammer crowns are square to
hammer sides
·
Clean up
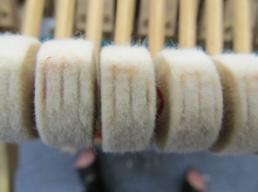
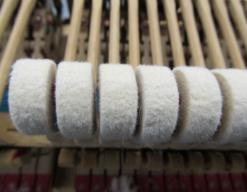
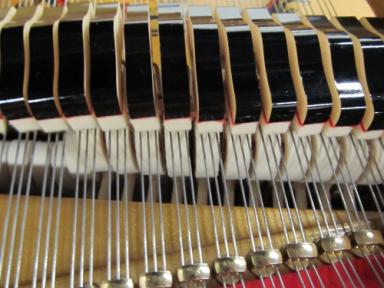
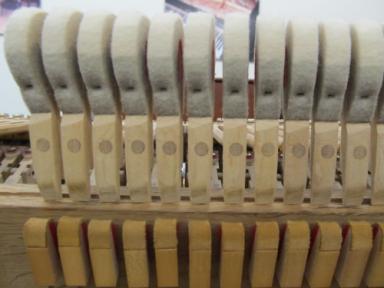
TYPICAL GROOVES FOR THIS AGE PIANO – RESHAPED ON RIGHT
TYPICAL FLAT HAMMER CROWN – BETTER SHAPE ON RIGHT
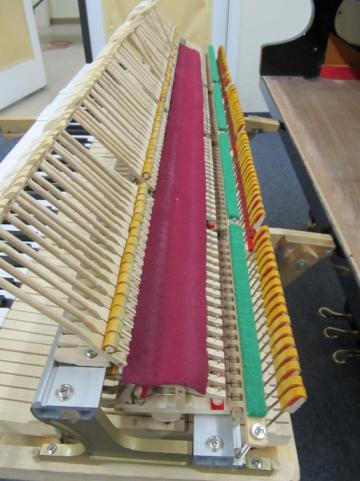
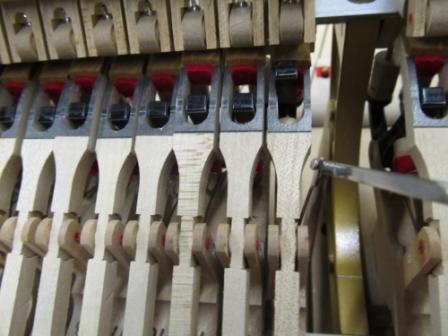
HAMMER TAILS SITTING ON CONTINUOUS SUPPORT
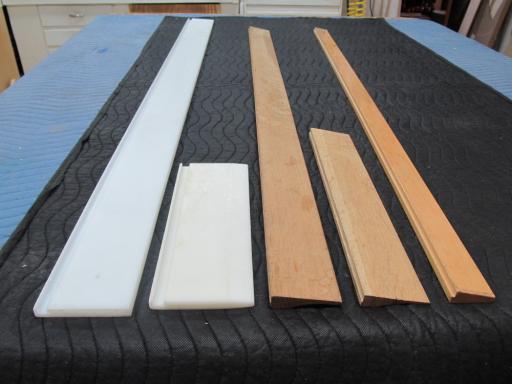
SHORT AND LONG SUPPORTS
·
END OF PRELIMS (4 hours of work, mostly taken up with tuning and
hammer filing)
BREAK FOR
LUNCH! --- OR COME BACK ANOTHER MORNING TO FINISH
************************************************************************
Minimum
Procedure for One-Day Regulating. It is now 1PM
NOTE 1: In
the Prelim section, samples have been set to verify AfterTouch
(AT)
NOTE 2:
positive drop (usually a bit excessive) is usually apparent in an
aging action that has not been tampered with. If positive drop is
not apparent, then turn all drop screws down a bit to make
it so. Failure to work with positive drop, even if too much at
this stage, will frustrate all further regulations!
·
With action assembled on the Edwards cart, quickly set a hammer
line – don’t be too fussy, get reasonably close
·
Check and / or set jacks to knuckle core (you may find the
Nuckljac tool helpful). You may leave jacks alone if very close
to perfect.
·
See Nuckljac at http://www.youtube.com/watch?v=yiw-1EWyrAc
·
Now working from behind the action, set
repetition spring strength for definite, but not too snappy,
hammer rise (CHECKING SHOULD BE CLOSE IF NOT EXACT)
SITTING BEHIND ACTION, APPLYING TENSION TO REP SPRING
NOTE
THAT DUE TO COILING DIRECTION, MOST REP SPRINGS ARE EASIER TO
WITHDRAW FROM RIGHT SIDE (as viewed from back of action)
·
Wink or roll
all the jacks to eliminate lost motion by adjusting rep lever
height screw. Hammer line will usually have changed and be
somewhat uneven.
·
Put action back in cavity and reset samples for hammer blow and
letoff and drop. Things should still look good for AT.
·
Remove action on to cart and re-set hammer line by eye, relative
to straightedge resting on hammer flanges. (WNG straightedge).
This hammer line should be fairly solid now.
 |
KEYBOARD EXTRACTED HALFWAY AND BALANCED ON ONE ARM OF CART -- Be
careful!
USING WNG LEVELER ATOP HAMMER FLANGES TO SET HAMMER LINE
SHORT GARDEN CART USED FOR SIGHTING
HAMMERS VIA WNG STICK
(Notice Extension Cord Reel in the back)
·
Install magnetic strips for letoff
·
Return action to cavity and set letoff on all notes
o
Turning letoff buttons, cause hammers to block lightly but
solidly against magnetic strips and then fall away
·
Recheck dip samples RE AfterTouch (AT) and set dip punchings at
all notes
o
Recheck AT for “jack gap”, and place punchings under
cloth
·
Remove action to cart and set drop for each note by eye
·
Set sample backchecks by eye. Relative to hammers at rest, set
checking to about 30mm above neighbor hammers (this yields about
15mm of checking from strings)
o
You will verify these in the piano and make mental notes to
correct out of the piano
·
Refine Backchecking
NOTE:
you should now have:
·
Correct blow
·
Proper letoff and drop
·
A workable dip within reasonable parameters
·
Positive AfterTouch
·
Acceptable repetition spring tension
·
Acceptable Backchecking
NOTE:
this regulation is NOT a Concert Prep, but does represent a
noticeable upgrade, and that is the point!
END OF
AFTETOUCH REGULATIONS (2.5 hours max)
TOTAL TIME
TO THIS POINT (6.5 HOURS)
***************************
HAMMER
VOICING & Touchup Tuning
o
Block hammers to strings
o
Idea is that hammer should mate with all three strings of a
unison
o
Reduces or eliminates tonal noise and “zings” for clean
tone
o
Use continuous felt strip placed over reps and under knuckles


PLACEMENT
OF CONTINUOUS FELT STRIP
o
Touch-Up Tune Piano
o
If tone is too bright needle down or use hammer softener from
Pianotek see http://www.pianoteksupply.com/product/1690/Hammer-Softener.aspx
o
If tone is a bit too dull in a section, say the melody section,
you may want to brighten up with a conservative juicing at the
shoulders, approaching the crown
o
Use one-half proportion of Pianotek’s hammer hardener
solution (acetone and pellets mix), see at http://www.pianoteksupply.com/product/1631/Hammer-Hardener-Pellets.aspx
o
You should have this mixed up beforehand
o
Apply with a hypo, be careful not to drip
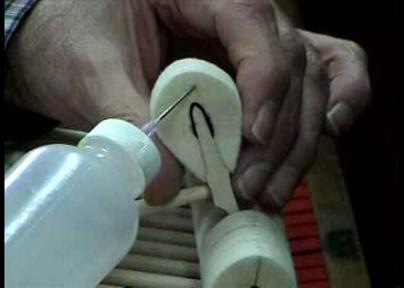
HYPO
APPLIES HARDENER FROM SIDE TO FIRM UP HAMMER CORE
END OF
TUNING AND VOICING (1.5 Hours Max) IT IS NOW 5PM
THUS THE
END OF AN 8 HOUR WORKDAY
*************************
Two videos AfterTouch
6:22 minutes and AfterTouch
2:51 min
l
With the above regulations exact or close, this is what to look
for:
l
Press the key:
–
Hammer rises to string
–
Jack
and rep lever escape simultaneously
–
Hammer should drop a bit
l
And as key bottoms out on front punching
–
the hammer and damper head should rise a bit farther
–
The jack will have cleared the knuckle, but not so far that
repetition suffers
–
The jack top should
not jam into the front of the rep lever slot
–
Simultaneous escapement should occur (jack and rep lever should
contact their respective letoff surfaces at the same time)
10 Action Regulating “High Points” guaranteed to improve performance!
1.
Key Level exact or close (glides correct)
2.
Dip exact or close to mfg. spec or workable
3.
Repetition springs not jumpy or slow
4.
Roll or “wink” jacks
5.
Blow distance
6.
Set escapements
7.
AFTERTOUCH should be apparent now…
8.
Set hammer line
9.
Backchecking at 5/8” or 15mm
10.
Damper timing at one-half blow distance
l
A Kibosh Item if way off for one-day prep
l
Check and reset UPSTOP RAIL!
Handout
copyright May 2013
Do not publish or copy or distribute all or
part without express permission of Nick Gravagne. Thank you for
your cooperation!